| Ch 7. Stress Analysis | Multimedia Engineering Mechanics | ||||||
|
Plane Stress |
Principal Stresses |
Mohr's Circle for Stress |
Failure |
Pressure Vessels |
|||
| Mohr's Circle for Stress | Case Intro | Theory | Case Solution | Example |
| Chapter |
| 1. Stress/Strain |
| 2. Torsion |
| 3. Beam Shr/Moment |
| 4. Beam Stresses |
| 5. Beam Deflections |
| 6. Beam-Advanced |
| 7. Stress Analysis |
| 8. Strain Analysis |
| 9. Columns |
| Appendix |
| Basic Math |
| Units |
| Basic Mechanics Eqs |
| Sections |
| Material Properties |
| Structural Shapes |
| Beam Equations |
| eBooks |
| Dynamics |
| Fluids |
| Math |
| Mechanics |
| Statics |
| Thermodynamics |
| ©Kurt Gramoll |
|
|
|||||
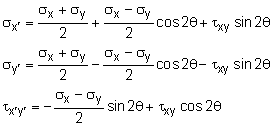
| Stress Rotation Equation |
|||||
|
|
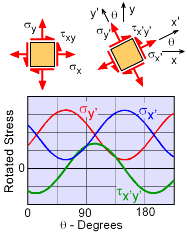
Previously, the stress transformation equations were developed to calculate the stress state at different orientations. These equations were Plotting these equations show that every 180 degrees rotation, the stress state repeats. In 1882, Otto Mohr noticed that these relationships could be graphically represented with a circle. This was a tremendous help in the days of slide rulers when using complex equations, like the stress transformation equations, was time consuming. |
||||
| Mohr's Circle |
|||||
|
|
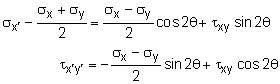
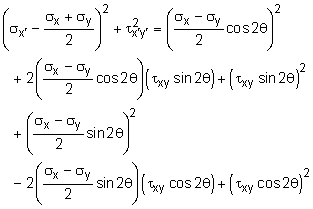
Mohr's circle is not actually a new derived formula, but just a new way to visualize the relationships between normal stresses and shear stresses as the rotation angle changes. To determine the actual equation for Mohr's circle, the stress transformation equations can be rearranged to give, Each side of these equations can be squared and then added together to give
Grouping similar terms and canceling other terms gives Using the trigonometry identity, cos22θ + sin22θ = 1, gives |
||||
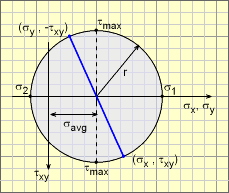 Basic Mohr's Circle for Stress |
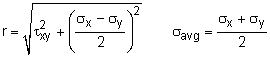
This is basically an equation of a circle. The circle equation can be better visualized if it is simplified to
This circle equation is plotted at the left using r and σave. One advantage of Mohr's circle is that the principal stresses, σ1, σ2 , and the maximum shear stress, τmax, are easily identified on the circle without further calculations. |
||||
| Rotating Stresses with Mohr's Circle |
|||||
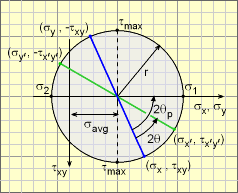 Stress Rotation with Mohr's Circle |
In addition to identifying principal stress and maximum shear stress, Mohr's circle can be used to graphically rotate the stress state. This involves a number of steps.
|
||||
|
The angle, 2θp, for the principal stresses is simply the half the angle from the blue line to the horizontal axis. Remember, Mohr's circle is just another way to visualize the stress state. It does not give additional information. Both the stress transformation equations and Mohr's circle will give the exactly same values. |
|||||


Practice Homework and Test problems now available in the 'Eng Mechanics' mobile app
Includes over 500 free problems with complete detailed solutions.
Available at the Google Play Store and Apple App Store.